Skip to product information
1 of 8

OmniGlow - CONTROL BOX Cable | upto 3m | B

OmniGlow - CONTROL BOX Cable | upto 3m | B

SKU:5cmFbEC_OmniGLOW

Regular price £10.90 GBP
Regular price Sale price £10.90 GBP
Sale Coming Soon!
Shipping calculated at checkout.
Control Box
>
LightStrip
?
Other Cables
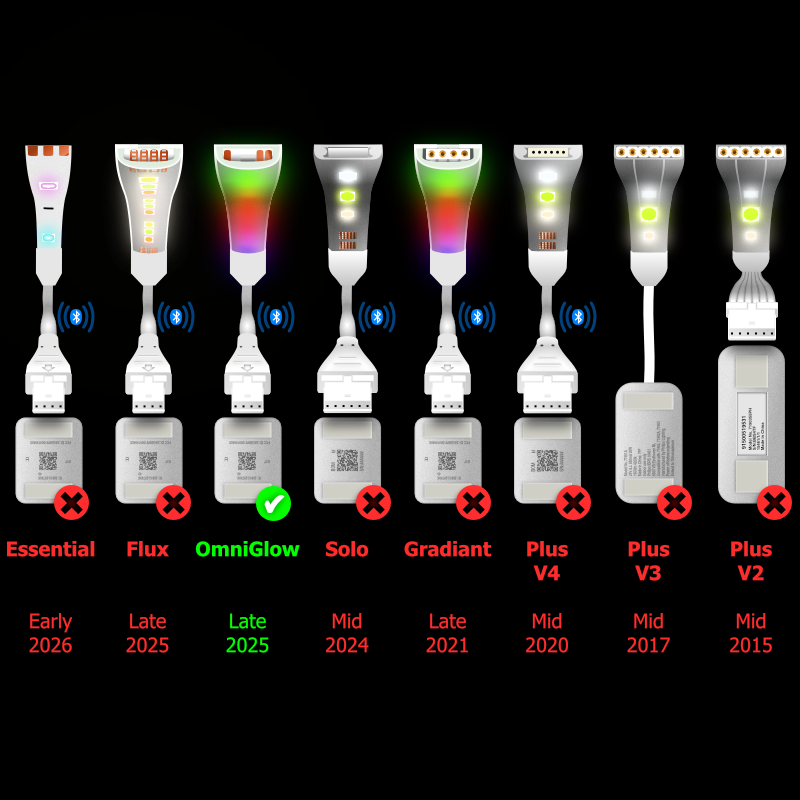
This is a custom-made Control Box Extension Cable for the Philips Hue OmniGlow LightStrip (made from late 2025, and able to display multiple colours at once). It extends the distance between the Control Box and the LightStrip only.

There are many ways to use these. For example, you may want to extend the distance from the plug to the first LightStrip, because it wouldn't reach that far on its own.

This will not work between any cut edges of LightStrip.

All of our Philips Hue OmniGlow LightStrip cables, leads and extensions are made with the correct connectors for the Philips Hue OmniGlow LightStrip system.
Dimensions


< Choose the Length >
These cables are made to order, to your exact length. If the length you need isn't in the options, just choose the next length up and let us know your exact measurement.

Unlike other Philips LightStrips, which are controlled by power to each of the five LED colours, OmniGlow LightStrips are controlled by data. Because power is delivered through a single core, resistance can affect performance. This is why the cable lengths are more limited than for other LightStrips. Please don't join cables together, as the longest length on offer is the longest that will work without issues.

All of the cables work, but if they're too long for the setup, they create too much resistance, which can make the LightStrip flash or blink at random. In our tests, the combinations shown with a tick work well, and those with a cross will flicker.

⚠️ Length compatibility chart
LightStrip Length
Cable Length
There's no exact formula for what will and won't work in every setup. This is why you can return these free of charge if they don't suit your particular needs.
Manual
1. Please switch off the LightStrip at the wall before plugging these cables in. The Control Box calibrates to new cables and Extension LightStrips when it's powered on, so it knows how far to spread the gradient.

2. Plug the male end of the cable into the LightStrip. Push the pins in firmly with a very slight side-to-side wiggle.

The pins should push all the way in, so that barely any of the pin is visible.

The connectors should meet the same way up. It will not work if it's plugged in the other way up. Plugging it in the wrong way up shouldn't damage the LightStrip, as long as it isn't left powered on for hours.

They usually fit quite tightly. As Philips didn't design these connectors with cables in mind, there's nothing to clip or lock onto. LightStrips only stay in place because they're stuck down with tape. In some situations, you may need to secure the connections with insulation tape or heat shrink.

3. Plug the female end into the Control Box.

4. When your setup is complete, plug the LightStrip back in. The LightStrip will calibrate, and you should see the connected sections light up. Once it's all done, sit back and bask in the light.
Compatibility
There are now many versions of the Philips Hue LightStrip, and many of them use different connectors. Most versions have two different-sized connectors: the Control Box socket and the LightStrip extension connector. That makes three different point-to-point cable combinations for each version, so dozens of combinations in total, plus splitters, all for different purposes.

As all of our cables are made to order, please double-check the diagrams and description before purchasing, to be sure this cable is compatible with your LightStrip, setup and needs.


View full details